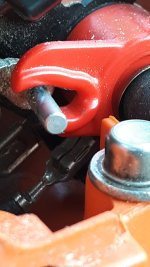
So my Rancher 450 won't shut down. I got a blank stare from the counter guy at my local shop when I explained the situation.  All wires appear to be connected and I couldn't find any info online for my model. Can't believe it can be complicated, but I'm still basically a greenhorn when it comes to chainsaws. I learned a ton since my last go round with the 450 so I am assuming there is still much to learn.
You are using an out of date browser. It may not display this or other websites correctly.
You should upgrade or use an alternative browser.
You should upgrade or use an alternative browser.
Saw Won't Shut Off?
- Thread starter MikeS
- Start date
Have you been wrenching on the saw- pulled stuff apart and put it back together- before this problem showed up?
Either power is not getting to the switch- or the earth is not being completed back to the coil mounting bolt.
There are only two wires- one goes to the plate the kill switch works on with a spade terminal, the other has a bullet terminal- check all connections and ensure when the kill is activated the spring plate contacts what it needs to in order to earth out.
Hey Bob! Hope you're out of the hospital by now.
The one wire that connects with the switch is firmly in place. I think this is the spade terminal you mentioned. I'm not sure what you mean by the bullet terminal. I did take the saw apart several times when I was dealing with the coil issue. Come to find out I royally effed up the fuel/oil issue. No damage to the piston, thank goodness. I will clean the black wire terminal to the coil I guess and see if that does anything. Been trying to figure this out without having to tear things down any further.
The one wire that connects with the switch is firmly in place. I think this is the spade terminal you mentioned. I'm not sure what you mean by the bullet terminal. I did take the saw apart several times when I was dealing with the coil issue. Come to find out I royally effed up the fuel/oil issue.
The two wires coming up from the coil are basically together as they enter the airbox, not far inside the box, further back than the spade terminal there is another round press together terminal (one shaped like a bullet goes into one that acts like a barrel chamber) if that one is disconnected- no earth back to coil mount.
Saws do not have blades- they have bars.
Follow the wires- they enter the airbox on the left as viewed from the saws operator position (rear of the saw).
Remove the air filter and whatever else you need to so you can follow their path. My guess is the bit the flat steel spring like feature is supposed to contact, is not in position or not connected to the wiring to allow the flat spring like piece of steel to contact it and thus complete the kill circuit.
Okay, lets walk through this step by step.
Do you have a blue wire- left hand side of the airbox area that terminates in a right angle female spade connector?
Do you have this spade connector fitted to the end of the spring steel plate via this bare uninsulated female spade connector?
Do you have a blue wire- left hand side of the airbox area that terminates in a right angle female spade connector?
Do you have this spade connector fitted to the end of the spring steel plate via this bare uninsulated female spade connector?
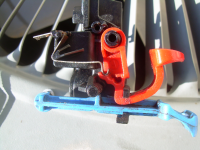
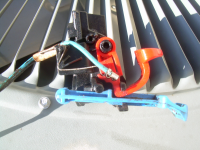
We have a flat connection (blue wire?) on the coil and a black wire with a round connector and bolted to the body of the saw also on the coil. I can see a flat connector wire (black?) attached directly beneath the switch. There's another wire connection just beyond that (bar facing to left) that I can't really tell where it goes. The first wire on the switch moves with the switch when you pivot it down to kill the motor. There also appears to be a flat metallic piece immediately below the switch that appears to have some connectivity to the first wire connected to the switch. Will try to get a pic tomorrow. I'm a visual type of person.
Right, the bare right angle spade connector does NOT attach to anything metallic- is sits in a recess on the red trigger- just to the rear of the shiny metal thing- you should see a suspicious looking spade connector fitting recess in the red plastic it press fits and sits in there- ready to contact the shiny metal bit WHEN the red lever is moved to the KILL or OFF position.
If you follow the blue wire back a couple of inches- there should be what appears to be a wire join under some white heat shrink. This is NOT a wire join, but another inline female spade connector. BEFORE you fit the bare spade at the end of the wire into the trigger recess, this connector must be slipped onto the end of the metal shiny bit that looks like a male spade connector- then fit the bare end connector into the trigger recess so that when the kill switch is activated- the bare terminal contacts the shiny metal and is separated from it when the kill in in the open or run position.
If you follow the blue wire back a couple of inches- there should be what appears to be a wire join under some white heat shrink. This is NOT a wire join, but another inline female spade connector. BEFORE you fit the bare spade at the end of the wire into the trigger recess, this connector must be slipped onto the end of the metal shiny bit that looks like a male spade connector- then fit the bare end connector into the trigger recess so that when the kill switch is activated- the bare terminal contacts the shiny metal and is separated from it when the kill in in the open or run position.
If you are a visual person- put photos up from the get go! 
I know, right?If you are a visual person- put photos up from the get go!
I know, right?
So do the above couple of posts explain to you what I have been trying to in text?
So, what did we discover and take photos of?
Okay- I must admit- I am not familiar with the system you have, only ones I associate with these is the one I pictured above.
This is certainly a 450 Rancher? Not an e or a MK2?
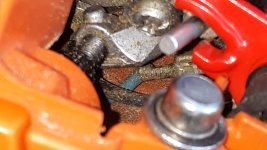
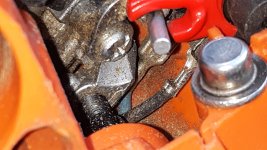
Basically- when the lever is set to the kill position- the black wire and the blue wire have to "connect" in order to earth out the spark.
I assume via that metallic dowel sitting in the cup of the red trigger stem?
Working the lever of the trigger on and off should indicate what happens- might be as simple as the black and blue wires need to swap position or orientation to make contact when and where they need to.
The black wire should attach to something metal and the blue wire not- on pushing the kill switch to the kill position should cause the blue wire to contact the metal the black wire is earthing to.


