You are using an out of date browser. It may not display this or other websites correctly.
You should upgrade or use an alternative browser.
You should upgrade or use an alternative browser.
Echo CS-351VL clutch removal
- Thread starter M&M
- Start date

There will be Echo specific clutch removal tools all over Ebay and Amazon- but there are several types.
You need a sense of scale to pick the correct one.
If you sit a penny on the crank stub centralised and look straight down on the penny face and the triangle on the clutch centre is same as or slightly smaller than the penny- you need the 3 pin flat face tool (part # 89750516133 ??).
If the triangle is bigger than the penny you need the one with the 3 pins and the 3 raised V sections on the underside face.
On top of those tools is a welded nut that should be 19mm- so in theory you can use your sparkplug removal tool for removing the clutch- odds are good that will not work and you might need a ratchet and or breaker bar- but remember clutches are left hand thread!
M&M
New member
Yes- but also remember I am recommending on borrowed information- we do not have pennies here!
But yes, I believe you need the smaller flat base tool.
However, if you have some steel- 3 small bolts and one large nut- it is not too hard with the assistance of a drill and a welder- to make your own tool, custom fit.
But yes, I believe you need the smaller flat base tool.
However, if you have some steel- 3 small bolts and one large nut- it is not too hard with the assistance of a drill and a welder- to make your own tool, custom fit.
M&M
New member
Bob,
Thank you for the information.
And likewise I've been toying with the thought of making my own tool.
Thank you for the information.
And likewise I've been toying with the thought of making my own tool.
M&M
New member
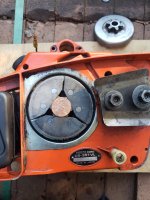
Got this bugger apart. Not sure what happened to the oil tube. It looks like it melted and is in a congealed puddle at the bottom of the oil reservoir. I'll have some cleaning to do before anything else.
I'm having difficulty finding a replacement oil tube so I figure I'll just make my own. What sort of tubing do you recommend for the oiler? Also should I cut a gasket for the casing halves or just use permatex?
See pictures of my homemade clutch tool and the inside of the casing halves.
I'm having difficulty finding a replacement oil tube so I figure I'll just make my own. What sort of tubing do you recommend for the oiler? Also should I cut a gasket for the casing halves or just use permatex?
See pictures of my homemade clutch tool and the inside of the casing halves.
Attachments
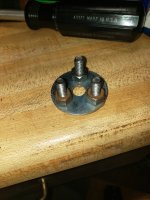


Nice work on the homemade tool- did you use a bar between the bolt heads to lever with?
Cant really help with the oil line- I do not know if they has a cast in grommet to seal through the case- or specific fit up to the pump?
But if i is straight shot nipple to nipple then Husqvarna coil type length of fuel line, or Stihl impulse line you can buy in 3 foot long sections will do- but most times you can buy Echo lines for fuel and or oil from the dealers, who have bulk pack rolls of the stuff.
Case gasket might be needed if case bolts go into governed depth holes- no gasket could mean the bolts bottom in the holes before pulling case together tight.
Gaskets are not hard to make, telephone book covers used to provide good case gaskets back in the day.
Last edited:
M&M
New member
Thanks for the props. It was really a very unfashionable solution but functioned relatively well.
I just used a large pair of Knipex adjustable pliers and grabbed the outside of the washer. It wasn't terribly tight. I probably will do something like a lever going back.
The gasket material currently on it looks almost like some orange-ish hardened sealant. Kinda reminds me of epoxy but that don't seem right. I read somewhere someone mentioned using a brown paper shopping bag. I guess that's just a bit thinner than phone book cover. I was concerned that might wick oil out. I guess not..
See the pic of the oiler tube nipple and oiler.
Attachments

Your oil line is no longer available- but was part number 43731010531 and it had an expanded end to fit the nipple, a right angle formed in the tube and a socket at the other end to allow for a pick up oil filter.
It is part #8 in the diagram.
Card or paper gaskets were quite common and you could also get CRC and Loctite products that were liquid gasket conditioners that would spray or foam brush onto the material the gasket was cut from and impregnate it somewhat to make it more permanent. I would test fit it dry and make sure the crank lobes did not contact the gasket less case and use a liquid gasket sealer if I could get away with it.