
Husqvarna 357XP

jpilk99

New member
Local time
5:54 AM
Joined
May 15, 2025
Reaction score
1
Location
Bolton, MA
My wonderful 357XP hit a speed bump recently. Wasn't running well, and I replaced the carb with a good one. Still wasn't running well ...and I checked compression and it was only 105psi. So I bought a new piston & rings. Gave it a good bath of mystery oil prior to starting, and cranked it over with no spark plug... She started and ran GREAT. For 2 minutes. It shut down immediately - as if I had hit the kill switch/turned it off.

I thought the rings might be "settling in" so I let it sit for a day or two. Tried again, and some thing - 2 minutes of great running and then abrupt stop. I checked the ignition coil and my tester lit right up. I tested the spark plug and it wasn't great, so I put in a new one. I let it cool down and went back and tried again, and nothing. Waited another few hours, still nothing. Even a little starter fluid down the spark plug hole - zilch. Checked compression, and it was about 55psi.

Pulled the head and piston was scored pretty well, on the exhaust side. Rings were stuck in. I also notice, both times when it ran, that it seemed to smoke. I thought it was just oily residue burning off the engine. Now I'm thinking it was running to hot, either lean or ....maybe the crank seal has "left the building".

I can get another piston, re-hone the cylinder, and try again ...but without knowing what happened to this setup, I'm likely destined to repeat it.

Any thoughts?

Thanks all!

Jay
 
Yes- you will keep destroying top ends as long as you keep buying and bolting them on.
Pressure and vacuum test before tear down- repeat test after rebuild.
My guess is it is running excessively lean and sucking air from somewhere outside the system.

Intake boot is a classic on these- especially if held to the cylinder with the plastic clip.
Small right angle impulse line is also often missed as a culprit- but it can be any one thing, or a combination of things- like crank oil seals as well.
 
Last edited:
Did a leak down and found that the crank seal on the flywheel side is leaking. Ordering new seal. Bearings seem good.

Going to search for seal replacement DIY's ...unless anyone here knows of one. Thank you!
 
Did a leak down and found that the crank seal on the flywheel side is leaking. Ordering new seal. Bearings seem good.

Going to search for seal replacement DIY's ...unless anyone here knows of one. Thank you!

Going to search for seal replacement DIY's

What do you mean? Ways of extracting the old and fitting the new?
If you have not done it before- google the drywall screw removal method- its about the easiest and cheapest method out there.
Pleanty of information out there about fitting new ones- I like old film negative as a guide over any crank steps, correctish size long reach socket to knock it into place with a hammer- but you can use what you have at hand- pieces cut from a plastic A4 document sleeve work as an over step guide- have used bits of the bag the seals come in before for that- piece of steel pipe cut square and true can be used instead of a socket if you dont have one.
The trick is to get it started without popping off the internal spring that holds the lip to the crank and drive it in square.
Take note of the seated depth of the old one before removing- drive the new one to the same position.
 
Going to search for seal replacement DIY's

What do you mean? Ways of extracting the old and fitting the new?
If you have not done it before- google the drywall screw removal method- its about the easiest and cheapest method out there.
Pleanty of information out there about fitting new ones- I like old film negative as a guide over any crank steps, correctish size long reach socket to knock it into place with a hammer- but you can use what you have at hand- pieces cut from a plastic A4 document sleeve work as an over step guide- have used bits of the bag the seals come in before for that- piece of steel pipe cut square and true can be used instead of a socket if you dont have one.
The trick is to get it started without popping off the internal spring that holds the lip to the crank and drive it in square.
Take note of the seated depth of the old one before removing- drive the new one to the same position.
Thanks again, Bob. I got the seal out/off doing essentially what you noted. And liking the "old film negative" approach vs. a cut piece of aluminum can or the like. Planning to use some PB Blaster to try and ensure whatever I use slides out afterwards!!! Hoping this works as I LOVE this saw.
 
Going to search for seal replacement DIY's

What do you mean? Ways of extracting the old and fitting the new?
If you have not done it before- google the drywall screw removal method- its about the easiest and cheapest method out there.
Pleanty of information out there about fitting new ones- I like old film negative as a guide over any crank steps, correctish size long reach socket to knock it into place with a hammer- but you can use what you have at hand- pieces cut from a plastic A4 document sleeve work as an over step guide- have used bits of the bag the seals come in before for that- piece of steel pipe cut square and true can be used instead of a socket if you dont have one.
The trick is to get it started without popping off the internal spring that holds the lip to the crank and drive it in square.
Take note of the seated depth of the old one before removing- drive the new one to the same position.
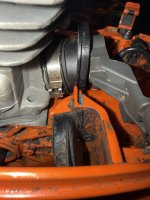
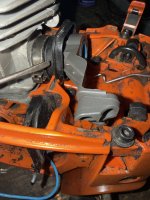
Hi again. I had to get a new piston & head, and have everything most of the way back together (haven't done the new crank seal yet) and I'm having a hard time getting the head all the way back down because the carb/intake boot is hitting the chassis. I know I need to have the "lip" of the intake boot on the "head side" of the chassis (see the 2nd image - I've got a screwdriver pointing to the "lip" I'm talking about. The first image shows that "lip" not fully behind the chassis wall...), but with it already on the new head ...I'm finding that I must not have it positioned correctly on the head itself.

How do Smart people get that rubber intake boot onto the new head --- to the proper depth, if you will, so that the lip fits in behind the cutout/wall of the chassis while allowing the head itself to slide back down correctly to allow the 4 bolts to secure it in place?
 

Attachments

  • IMG_9169.jpeg
    IMG_9169.jpeg
    523.4 KB · Views: 1
  • IMG_9166.jpeg
    IMG_9166.jpeg
    591.6 KB · Views: 1
Do I put the boot on AFTER I've bolted the head back on? (not sure there's enough room to slide it into place)....
 
Cannot say I have ever run into this issue- what top end are you using? If an Amazon special it might be in the angle of the intake casting.
To me after a quick look- its almost like the boot is not fully seated on the cylinder- not all the way on before the band clamp installed.
I am not a great fan of that style of band- but it is a whole lot better than the earlier plastic version!

Were you 100% sure the nipple on the inside of the boot was lined up with the receiving hole in the cylinder- misaligned it can make the boot sit funny and become kind of squished.
 
Back
Top